Non sono moltissime le ricette che trovo online e faccio più volte, perché mi piace provare sempre qualcosa di nuovo. Ma, ovviamente, capitano le eccezioni. È il caso di questo panfocaccia, visto qui e già fatto due volte, entrambe con enorme successo.

È perfetto per un picnic o un buffet, per il baracchino da portarsi al lavoro, per pranzo e, se cotto in una teglia rettangolare e tagliato a quadratini, anche per un aperitivo.
Potete variare il ripieno come più vi piace, e se volete renderlo un po' fancy, potete anche farci una bella decorazione. O tenerlo semplice, in stile rustico e più casereccio. Insomma trovatemi un motivo per non farlo!! Scommetto che non ci riuscite ;)
Ingredienti (per uno stampo basso da 26-28 cm):
460 g farina 00
½ bustina di lievito Mastrofornaio
1 cucchiaino di zucchero
250 ml latte
1 tuorlo
30 g olio evo
8 g sale
per la farcitura (modificabile a piacere):
scamorza affumicata
olive verdi
prosciutto cotto/tacchino a fette
Preparate l'impasto mettendo nella ciotola della planetaria (io col Kitchen Aid che non lascerò mai più) la farina con il lievito e lo zucchero, il latte tiepido, l'olio e il tuorlo. Col gancio, azionate la macchina e quando l'impasto si forma aggiungete il sale e impastate per qualche minuto fino ad avere una palla morbida ma compatta. Lasciate riposare nella ciotola unta e coperta con pellicola per 2 ore. Io mi trovo bene a mettere la ciotola nel forno spento e chiuso, con una tazza d'acqua bollente che aiuta la lievitazione e rende l'impasto morbido e umido.
intanto tagliatevi tutti gli ingredienti per il ripieno a cubettini, e metteteli in frigo in una ciotola.
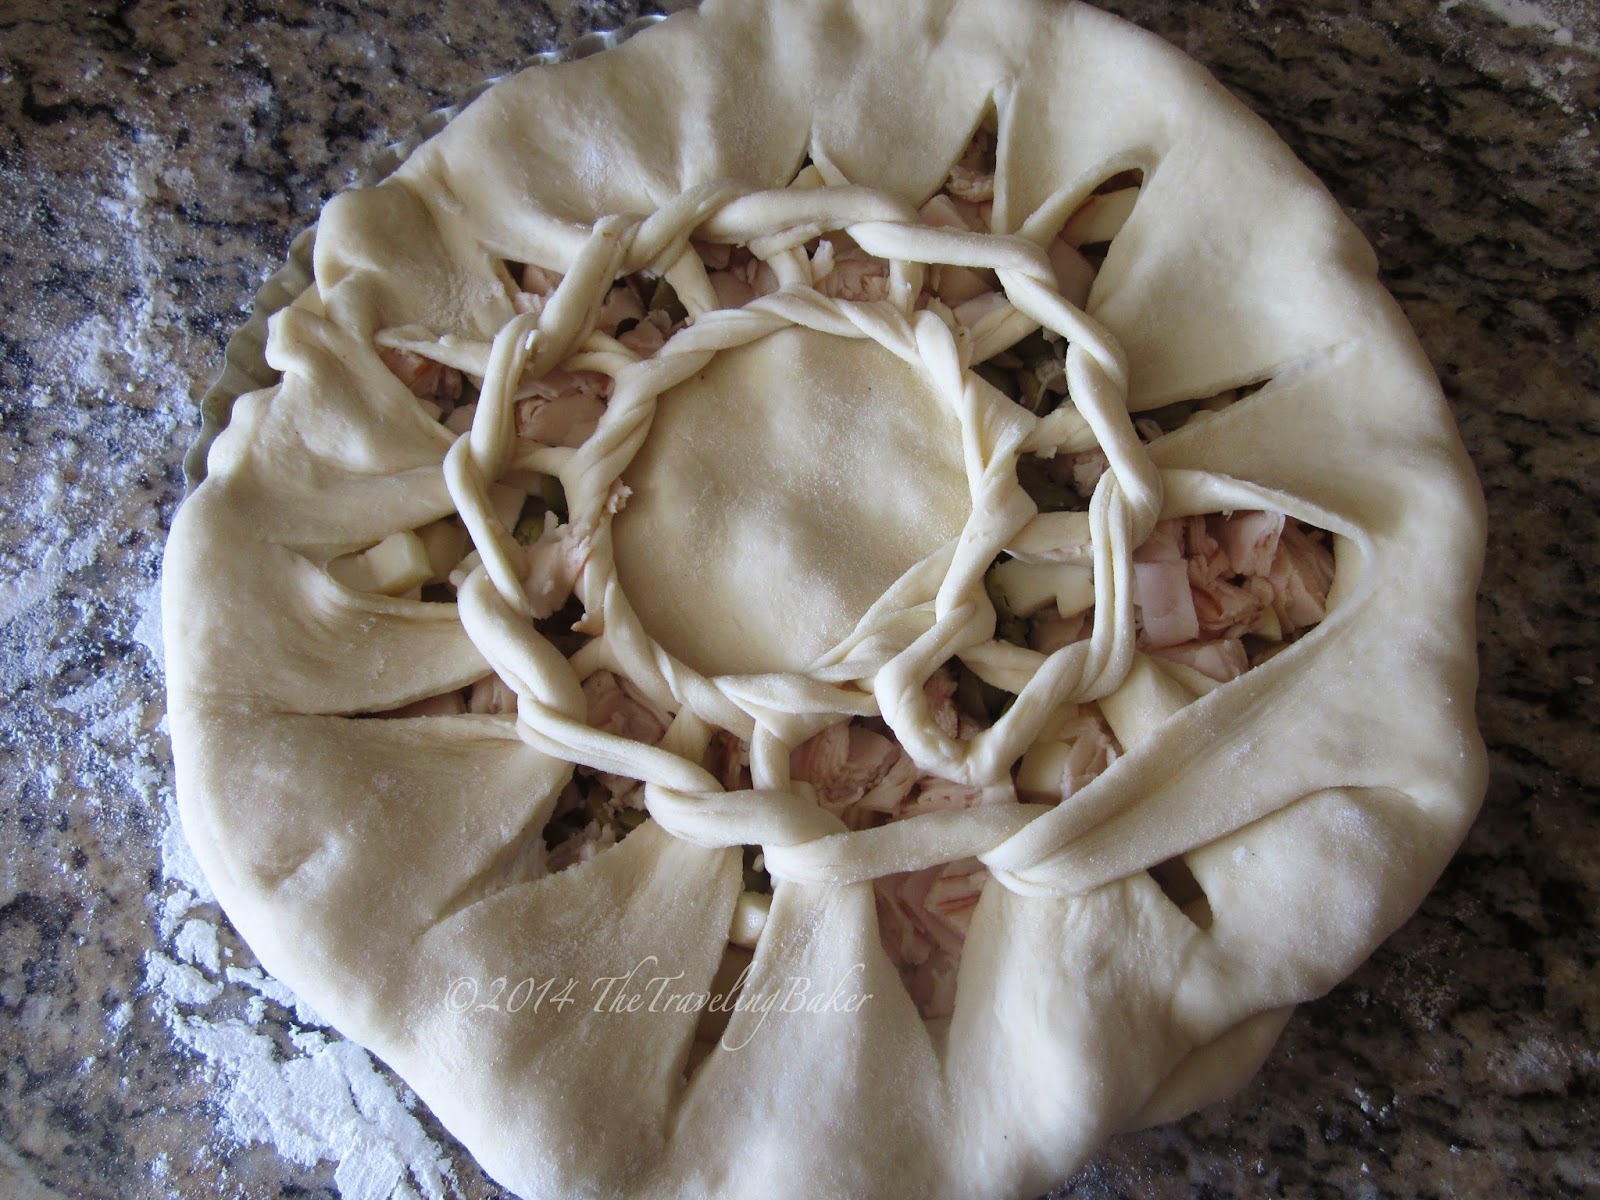
 Trascorse le 2 ore prendete l'impasto e dividetelo in 2 parti, una leggermente più grande dell'altra. Ungete la teglia scelta con un pochino di burro. Stendete la parte di pasta più grande e adagiatela nella teglia. Coprite il fondo col ripieno scelto, poi stendete la seconda parte di pasta. Fate su di essa delle incisioni a raggiera, lasciando un cerchio intero nel centro (le foto spiegano meglio di me sicuro) e fermandovi prima dei bordi.
  Stendete la pasta sopra il ripieno e sigillate bene i bordi. A questo punto, avete due possibilità: o lasciate la focaccia così com'è e vi verrà un buonissimo panfocaccia in stile rustico; oppure potete intrecciarlo per renderlo più figo. Io la prima volta non ho capito una mazza su come intrecciarlo e dopo vari tentativi falliti ho lasciato perdere perché stavo rovinando il tutto. Poi mentre stava in forno mi è venuta l'illuminazione e la seconda volta ci sono riuscita. Anche se ho fatto un errore all'inizio.
Volevo fare un video perché spiegarlo a parole non è semplicissimo, ma ero da sola e o intrecciavo o filmavo, cosí niente.
La pasta è morbida e molto elastica, quindi potete tirarla (sempre con delicatezza, s'intende) con facilità. Prendete una striscia, fatela passare SOTTO quella alla sua destra, e tiratela verso sinistra. Fate lo stesso con la striscia successiva (procedendo in senso orario) fino a completare il giro. Qui vi spiega il procedimento con delle foto (ma secondo me manca il passaggio cruciale quindi ci ho messo un po' a capire...).
Spennellate con del latte e lasciate lievitare di nuovo per un'oretta, sempre nel forno spento.
Dopodiché cuocete in forno caldo 180°C per circa 30 minuti o fino a doratura.

Servite calda o tiepida, ma anche fredda non è affatto male, manca solo l'effetto filante del formaggio sciolto che, diciamolo pure, ha sempre un certo fascino.
STUFFED SOFT BREAD
This recipe is awesome, I made it twice in a week -and that doesn't happen often in our house because I usually like to try new things.

The second time I made it when my mother in law was here visiting, and we packed it up for a picnic on the beach. She liked it and asked me the recipe.
The decoration is optional, I kind of like it without it, it has a more rustic homey look. But if you wanna go fancy... well, that you can braid it. The first time I made it, I couldn't understand how to braid it and I gave up. The second time I made it (with a little mistake), but expect for my own satisfaction it really didn't make a different in the flavour. So it's up to you. I'll try to explain how to braid it but it won't be easy in words. A tutorial video would have done it. Too bad that to braid it you need two hands and nobody was around so I had to forget about the video.
You can choose any kind of filling you want. I would use a strong flavour cheese, like smoked scamorza, fontina, emmenthaler.
It's wonderful eaten warm, hot, or even cold, for a buffet, a picnic, a dinner or even a snack, why not.
Ingredients for a 10"-11" pan:
460 g AP flour
8 g Active Dry Yeast
1 tsp sugar
250 ml milk
1 yolk
30 g extra virgin olive oil
8 g salt
for the filling:
smoked scamorza
green olives
Deli turkey or chicken breast
In your Kitchen Aid, with the hook attachment, put the flour with the yeast, the sugar, the warm milk, the oil and the yolk. Start the machine and when the dough comes together, ass the salt and knead for a few minutes until you get a nice soft ball. Grease the bowl with some oil and place the dough inside, cover with cling film and let it rest for 2 hours in a warm place. I like to put my dough in the oven, with a cup of boiling water at the far end. It helps the rising keeping your dough moist and elastic.
Meanwhile, cut all the ingredients for the filling in little pisces, place them in bowl and store it in the refrigerator.
After 2 hours, the dough will have doubled its size. Divide it in 2 parts, one a little bigger. Grease the pan with a little butter, and roll out the biggest piece. Place it in the pan, leaving the edges out (so you can seal them with the upper part). Cover the bottom with the filling.
Roll out the second half, place a bowl in the centre, and cut around it like sun rays, stopping before the edge (see picture, you'll understand right away).
Lay the dough on top of the filling, sealing the edges.

At this point, either you leave it the way it is, which I like because it's simple, rustic, and quick. Or - for a special occasion or whatever- you wanna make it pretty, take one stripe, pass it UNDER the stripe on its right (counter clockwise) and pull it toward the left. Take the stripe after (clockwise), pass it under the first one, and pull toward the left. Keep going all the way around.

Once you are done, brush with some milk and let it rise again for an hour in a warm place.
Bake at 350°F in pre-heated oven for 30 minutes or until golden.
Ma che meraviglia, sono sicura che l'intreccio non mi riuscirà mai!!! brava
ReplyDeletese è riuscito a me (quasi) ti riesce di sicuro!! ma tanto chi se ne importa, eè buono e bello anche senza intreccio!!
Deletemmmmm...già solo a vederlo mi viene l'acquolina....che delizia!
ReplyDeleteè proprio buono simo, dovresti provarlo al prossimo picnic o uscita primaverile! non manca molto dai! ;)
DeleteDalle foto sembra squisita... da provare assolutamente
ReplyDeleteCiao Fabio e grazie della visita! Mi ha salvata già due volte facendomi fare un figurone con sforzo quasi minimo quindi... hai ragione, eè da provare!
Delete